OSE Ψ refrigerators - Model upgrading & details by P87 - standards
Hello people.
I attach some pics of my upgraded PROTO: 87 2-axled refrigerator wagon (Ψ3 named by ΟΣΕ). I am very new in PROTO: 87, so it's very logical to make mistakes. I like PROTO: 87 upgrading of rolling-stock, as I see a model train to operate to the prototype in scale.
As you know PROTO: 87 concentrates on operation of wheel/rail exactly to the prototype: working-suspension mainly in 2-axled wagons, exact wheels, exact rails, exact couplings, etc. The track I use (BAHNSINN, Germany) consists of 3 x 30meters sections = 3 x 344.82mm track-lengths (In Greece, we used lengths of 18-36meters - french system, however with german and french permanent way / track materials), with:
- code 70 nickel/silver rail-profile = S49 rail-profile of 1960s (49.43kgrs/m).
- cast brass fastenings of the type K: Klemmplatte (used in Greece either with wooden or with steel sleepers)
- laser-cut wooden sleepers
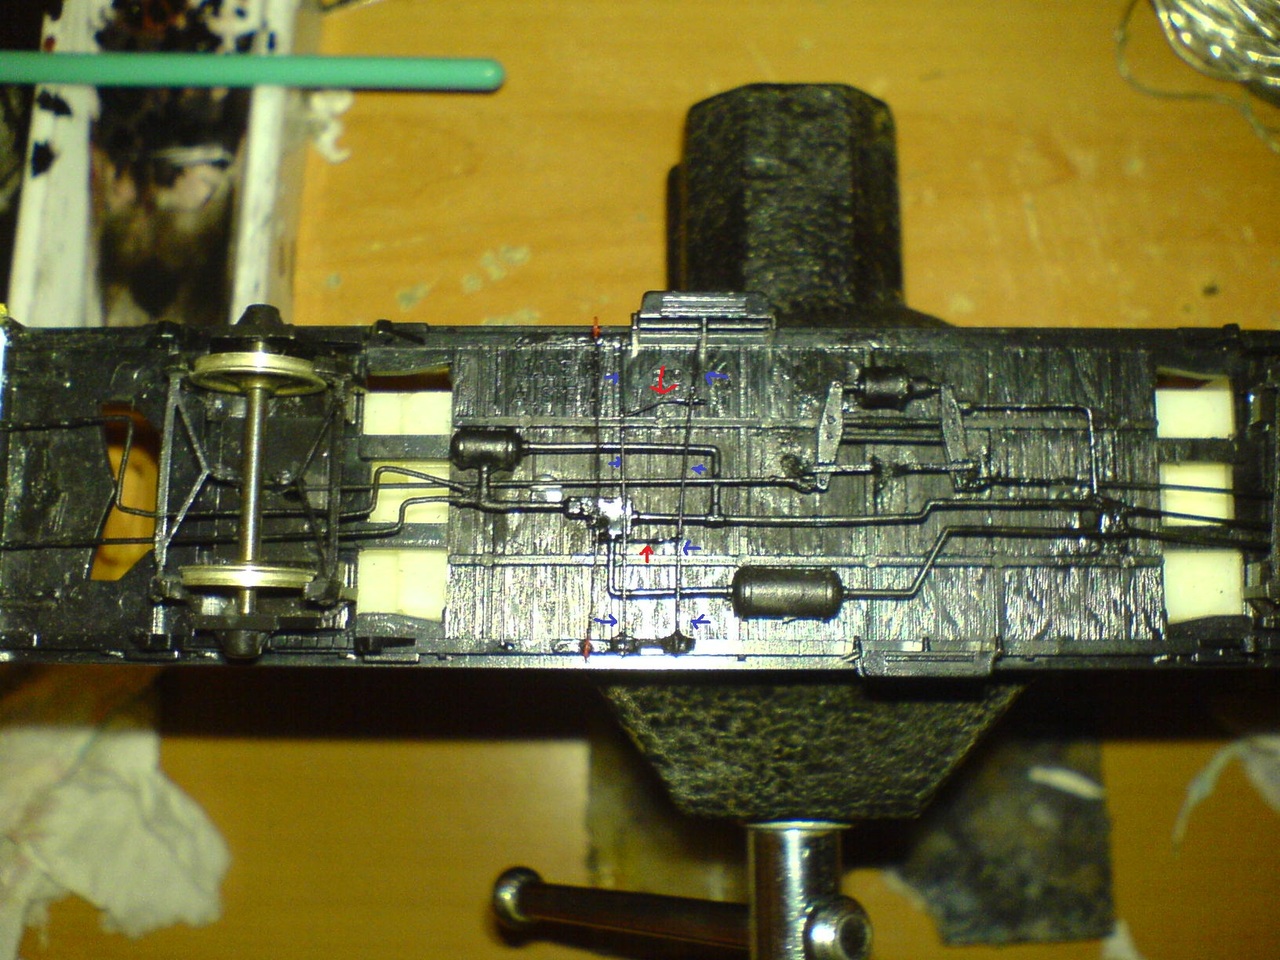
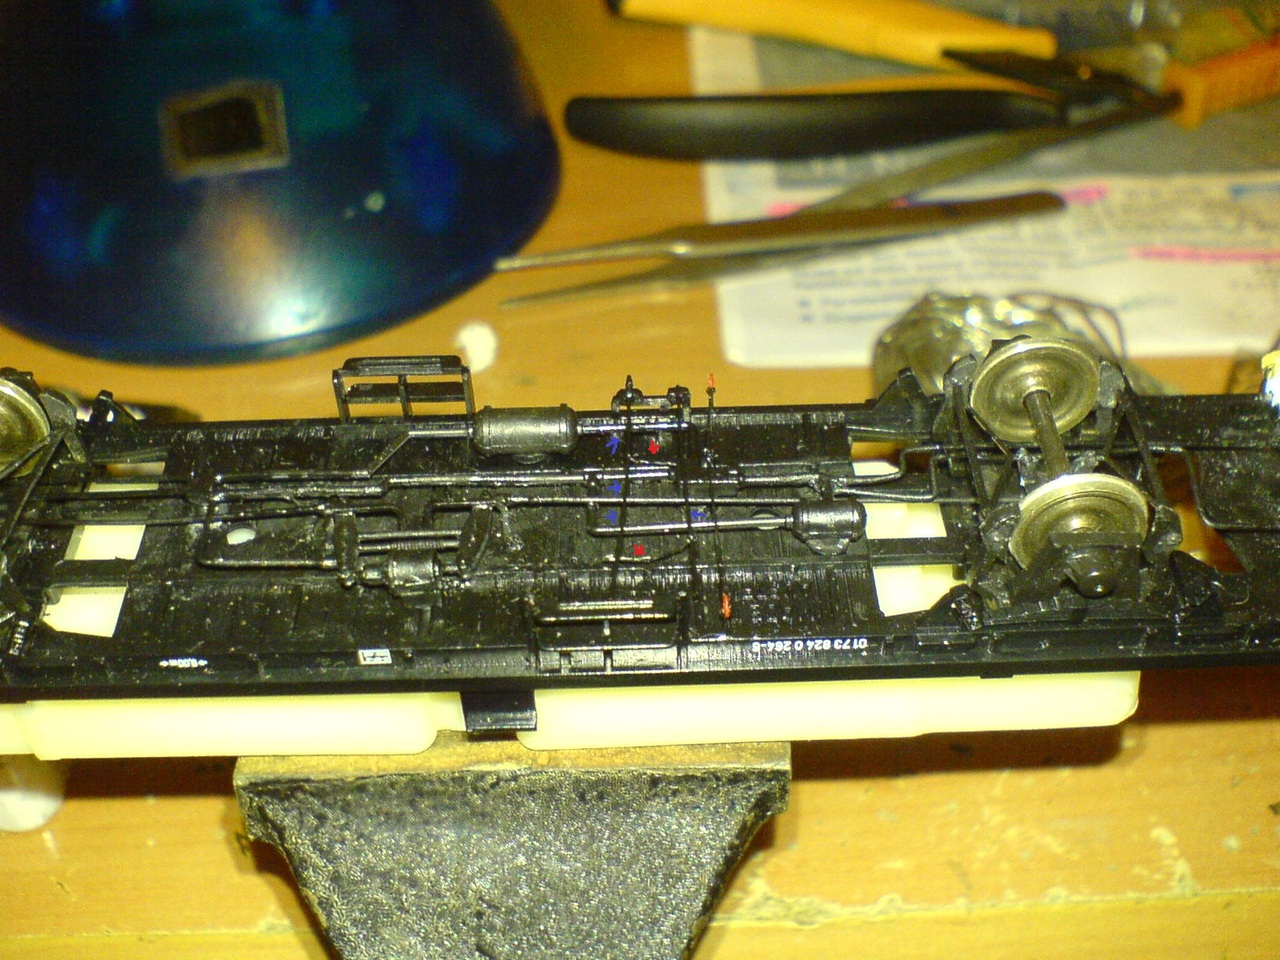
A. The upgrade of the buffer-beam (plank) (Pufferbohle) consists of:
1. Screw-couplings (Schraubenkupplungen / Atellage a vis) out of brass, blackened, from WEIMANN HO (1: 87).
2. Hooks out of 0.3mm-brass wires - glued underneath the coupling-plates (Kupplungsflänsche / plaque d'attelage), to protect the couplings and the other parts of the bufferbeam, when hanged on them, during train movements according to the prototype.
3. Airbrake-pipes (Bremssläuche / Accouplement de frein) out of brass casting (Messingguß), from WEINERT HO (1: 87).
4. UIC - Shunting-steps (Rangierertritte) out of etched nickel/silver parts, from ÜDO BOHNLEIN HO (1: 87).
5. Shunting handrails (Rangierergriffe): I used already bended brass handrails of 0,3mm-diameter (WEINERT HO (1: 87)), in which I have hammered their ends, to make their circular shape as orthogonal and wide. Then I used a needle on my hand-'archimedes'-drill, to make small holes on them, for passing through 0.3mm-brass wire. Then I have soldered the wire, and then I have cut with a smooth cutter (that makes they area that is cut very smooth) the excess. And then I have added them with super glue (but carefully with a needle, for not having excessive glue) below the buffers.
6. High-power buffers (Hochleistungspuffer) out of brass with 65t - Endforce of the bufferplate (according to prototype), from WEIMANN HO (1: 87). This type is constructed only with bufferplates screwed (Pufferteller geschraubt), and their Bufferplate-diameters are: either 450mm = 5.2mm in HO (1: 87) and 340mm = 4.3mm in HO (1: 87) (i.e. DB Taems890, DB Es), and they have a length of: 620mm to prototype.
7. Buffer plates before buffers (Spannplatte) out of brass castings (Messingguß), from WEIMANN HO (1: 87).
B. The upgrade of the brake-system (systeme de frein / Bremsanlagen) consists of:
1. Triangle de frein (force) (Bremsdreiecke) and Balancier hauts out of etched brass parts, from WEINERT HO (1: 87).
2. Cylindre du air (Bremszylinder) and Balancier (Bremshebel) out of brass castings (Messingguß), from WEINERT HO (1: 87).
3. 0,5mm - brass wire (laiton fil / Messingdraht) for the connections of the brake-system to the airbrake-pipes (Accouplement de frein / Bremssläuche) from WEINERT.
4. The Distributeur (Steuerventil) is from ROCO HO (1: 87).
5. The Reservoir du air (Luftbehälte) is from ROCO HO (1: 87).
6. Finally the Etriers (Bremsfachschlingen), I have to search and find similar to the prototype, or probably make it out of brass.
C. Exact wheelsets to the prototype:
FREMO : 87 / PROTO: 87 blackened nickel/silver wheelsets - 10,57mm in diameter (type: BA88/72 - construction-year after 1972) from WEIMANN HO (1: 87) = 920mm exactly to the prototype.


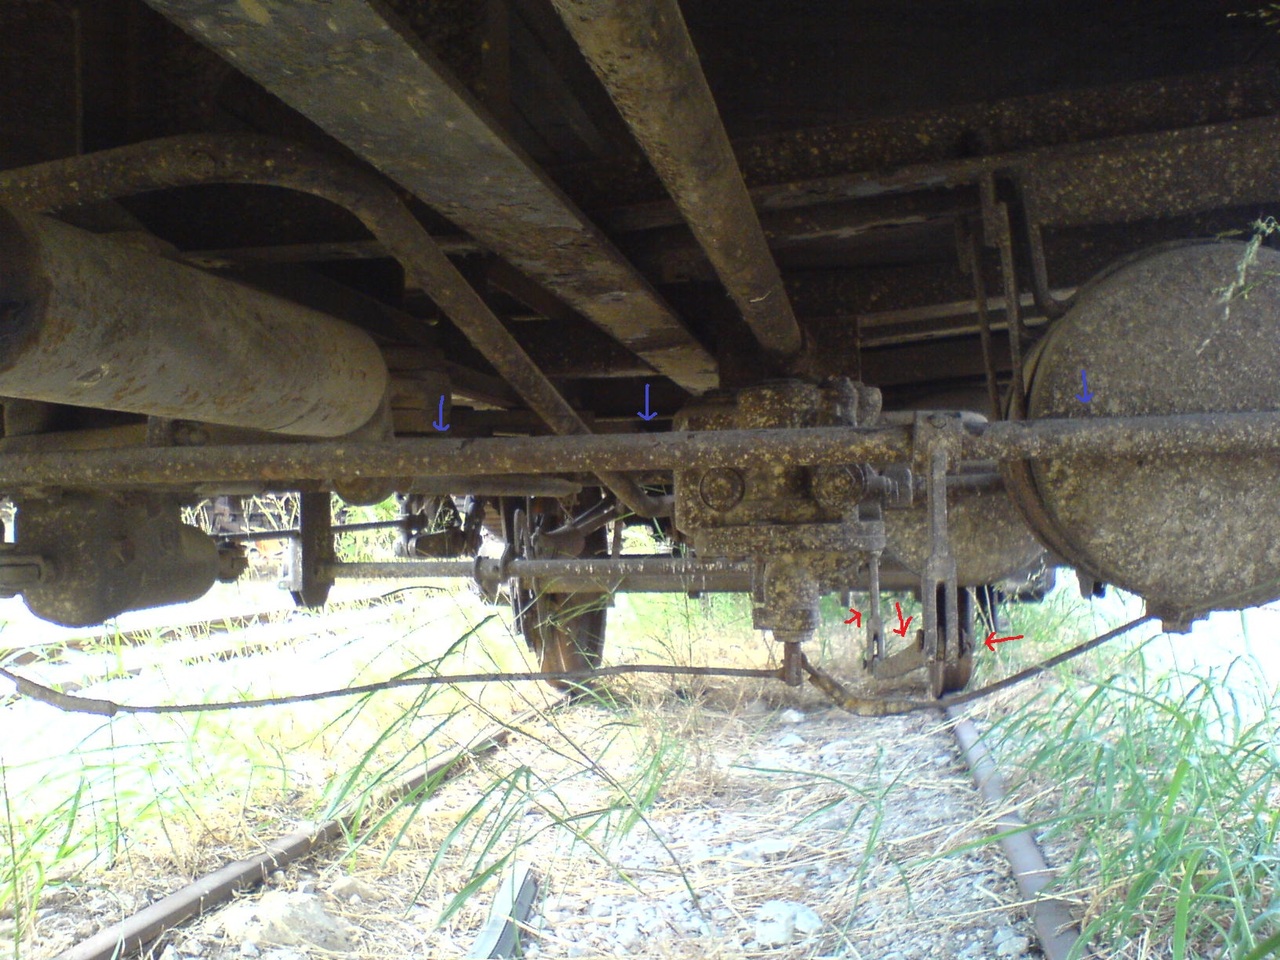
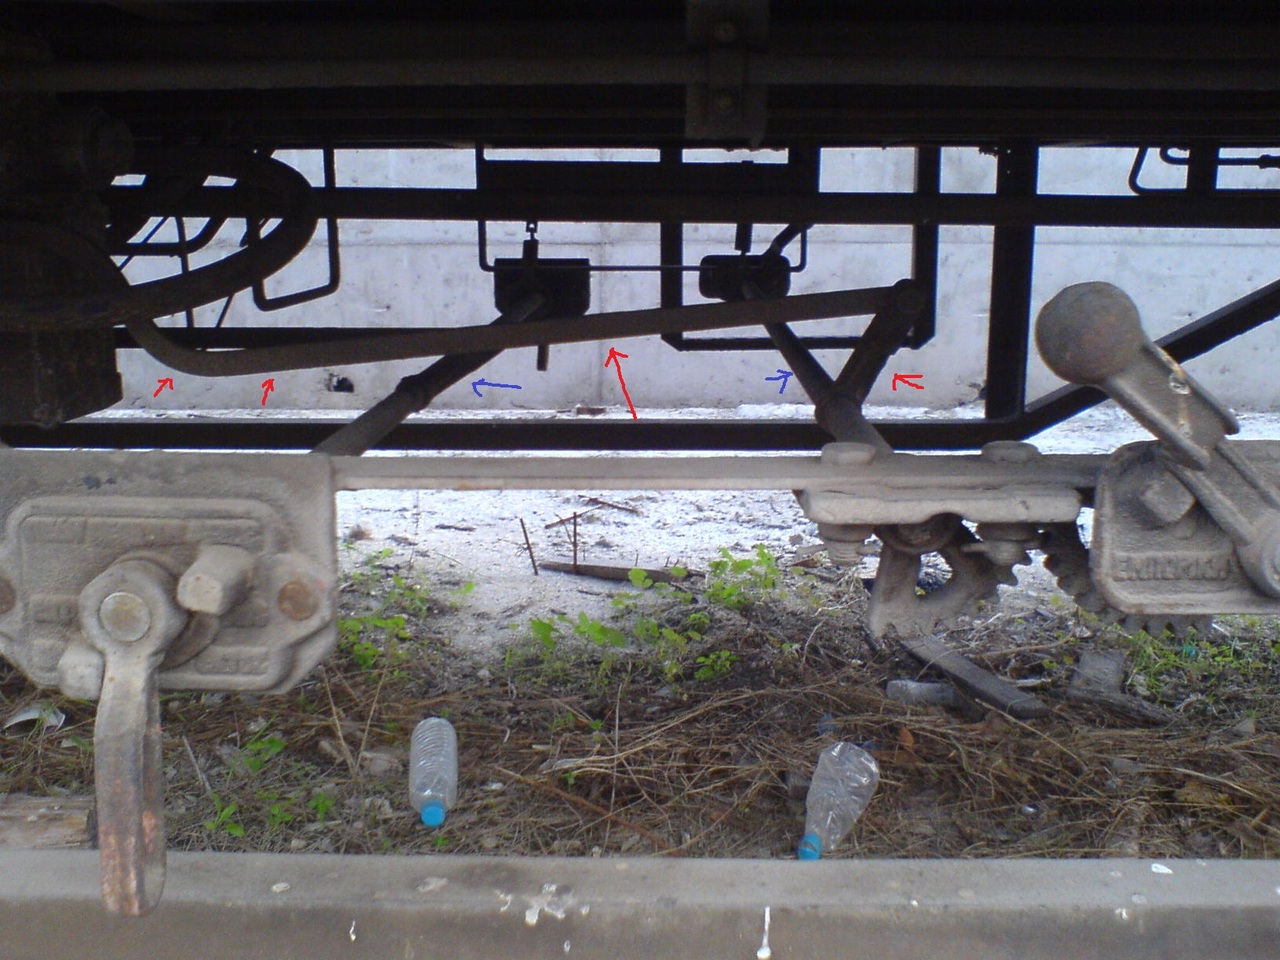
As you see in the last pic of the prototype in the railway station of Thiva (December 2012), the coupling is ''missing'' / stolen, but the hook is there.. Thank God.. They don't take care our rolling stock and infrastructure at all in Greece as you know...
I like greek train models, because they are unique, but unfortunately, this is the only greek model, I've got until now. In the future, I will get some more and upgraded by PROTO: 87 stnadards.
I saw all your posts, and I learn more about greek rolling-stock. They are very helpful.
Thank you very much for watching
Dimitris
I attach some pics of my upgraded PROTO: 87 2-axled refrigerator wagon (Ψ3 named by ΟΣΕ). I am very new in PROTO: 87, so it's very logical to make mistakes. I like PROTO: 87 upgrading of rolling-stock, as I see a model train to operate to the prototype in scale.
As you know PROTO: 87 concentrates on operation of wheel/rail exactly to the prototype: working-suspension mainly in 2-axled wagons, exact wheels, exact rails, exact couplings, etc. The track I use (BAHNSINN, Germany) consists of 3 x 30meters sections = 3 x 344.82mm track-lengths (In Greece, we used lengths of 18-36meters - french system, however with german and french permanent way / track materials), with:
- code 70 nickel/silver rail-profile = S49 rail-profile of 1960s (49.43kgrs/m).
- cast brass fastenings of the type K: Klemmplatte (used in Greece either with wooden or with steel sleepers)
- laser-cut wooden sleepers
A. The upgrade of the buffer-beam (plank) (Pufferbohle) consists of:
1. Screw-couplings (Schraubenkupplungen / Atellage a vis) out of brass, blackened, from WEIMANN HO (1: 87).
2. Hooks out of 0.3mm-brass wires - glued underneath the coupling-plates (Kupplungsflänsche / plaque d'attelage), to protect the couplings and the other parts of the bufferbeam, when hanged on them, during train movements according to the prototype.
3. Airbrake-pipes (Bremssläuche / Accouplement de frein) out of brass casting (Messingguß), from WEINERT HO (1: 87).
4. UIC - Shunting-steps (Rangierertritte) out of etched nickel/silver parts, from ÜDO BOHNLEIN HO (1: 87).
5. Shunting handrails (Rangierergriffe): I used already bended brass handrails of 0,3mm-diameter (WEINERT HO (1: 87)), in which I have hammered their ends, to make their circular shape as orthogonal and wide. Then I used a needle on my hand-'archimedes'-drill, to make small holes on them, for passing through 0.3mm-brass wire. Then I have soldered the wire, and then I have cut with a smooth cutter (that makes they area that is cut very smooth) the excess. And then I have added them with super glue (but carefully with a needle, for not having excessive glue) below the buffers.
6. High-power buffers (Hochleistungspuffer) out of brass with 65t - Endforce of the bufferplate (according to prototype), from WEIMANN HO (1: 87). This type is constructed only with bufferplates screwed (Pufferteller geschraubt), and their Bufferplate-diameters are: either 450mm = 5.2mm in HO (1: 87) and 340mm = 4.3mm in HO (1: 87) (i.e. DB Taems890, DB Es), and they have a length of: 620mm to prototype.
7. Buffer plates before buffers (Spannplatte) out of brass castings (Messingguß), from WEIMANN HO (1: 87).
B. The upgrade of the brake-system (systeme de frein / Bremsanlagen) consists of:
1. Triangle de frein (force) (Bremsdreiecke) and Balancier hauts out of etched brass parts, from WEINERT HO (1: 87).
2. Cylindre du air (Bremszylinder) and Balancier (Bremshebel) out of brass castings (Messingguß), from WEINERT HO (1: 87).
3. 0,5mm - brass wire (laiton fil / Messingdraht) for the connections of the brake-system to the airbrake-pipes (Accouplement de frein / Bremssläuche) from WEINERT.
4. The Distributeur (Steuerventil) is from ROCO HO (1: 87).
5. The Reservoir du air (Luftbehälte) is from ROCO HO (1: 87).
6. Finally the Etriers (Bremsfachschlingen), I have to search and find similar to the prototype, or probably make it out of brass.
C. Exact wheelsets to the prototype:
FREMO : 87 / PROTO: 87 blackened nickel/silver wheelsets - 10,57mm in diameter (type: BA88/72 - construction-year after 1972) from WEIMANN HO (1: 87) = 920mm exactly to the prototype.
As you see in the last pic of the prototype in the railway station of Thiva (December 2012), the coupling is ''missing'' / stolen, but the hook is there.. Thank God.. They don't take care our rolling stock and infrastructure at all in Greece as you know...
I like greek train models, because they are unique, but unfortunately, this is the only greek model, I've got until now. In the future, I will get some more and upgraded by PROTO: 87 stnadards.
I saw all your posts, and I learn more about greek rolling-stock. They are very helpful.
Thank you very much for watching
Dimitris